BLOG
KO
How I cut nextjs deploy time by 50%
- 0. Diagnose current situation
- 1. Understanding Yarn Berry & PnP Concepts
- 1-1. Yarn Berry?
- 1-2. PnP(Plug'n'Play)
- ❓ ZipFS (Zip File System)
- 2. Applying Yarn Berry
- 2-1. Initialization
- 2-2. Installing dependencies
- 2-3. gitignore (with or without zero install)
- 2-4. IDE Plugin Installation
- 3. Zero Install strategy, and why we didn't adopt it
- 3-1. still large dependency files
- 3-2. yarn install doesn't take long
- 4. Next.js and Docker Optimization
- 4-1. Next.js standalone
- 4-2. why we used node_modules instead of PnP in Docker
- 4-3. Multi-stage Dockerfile
- Conclusion
- References
"Just made the fix, will be reflected on production in n minutes!"
As we've been developing various products in a short time frame, deployments to development and production servers have become much more frequent than before. Running QA, pushing hotfixes, deploying to production...
On a day like any other, while actively running deployments, we encountered a situation where GitHub Actions wouldn't run despite nothing being wrong. Looking into the cause, we found that the GitHub Action budget allocated had been exceeded, making it impossible to run any more actions. The budget resets every month, and this issue occurred on the 25th, making it quite a serious problem...
Fortunately, we had a relatively low budget allocated, so we resolved it by increasing the limit. However, this was a situation that needed to be addressed as soon as possible. The deployment time (GitHub Actions alone, nearly 10 minutes including CodeDeploy) taking anywhere from 3 to over 5 minutes was already problematic, but not being able to deploy at all...?
To solve this problem quickly, I decided to start by reducing the deployment time for the Next.js service that has been most actively developed and deployed recently. In this post, I want to record the process of reducing deployment time in a Next.js, Docker, and CodeDeploy environment.
TL;DR
- Conducted in Next.js and Yarn environment
- Covers how Yarn Berry and Zero Install were utilized
- Discusses Next.js's standalone option
- Addresses considerations in Docker and ECS environments
0. Diagnose current situation
The first action needed is to understand the current architecture and deployment pipeline.
Simply illustrated, it looks like this:
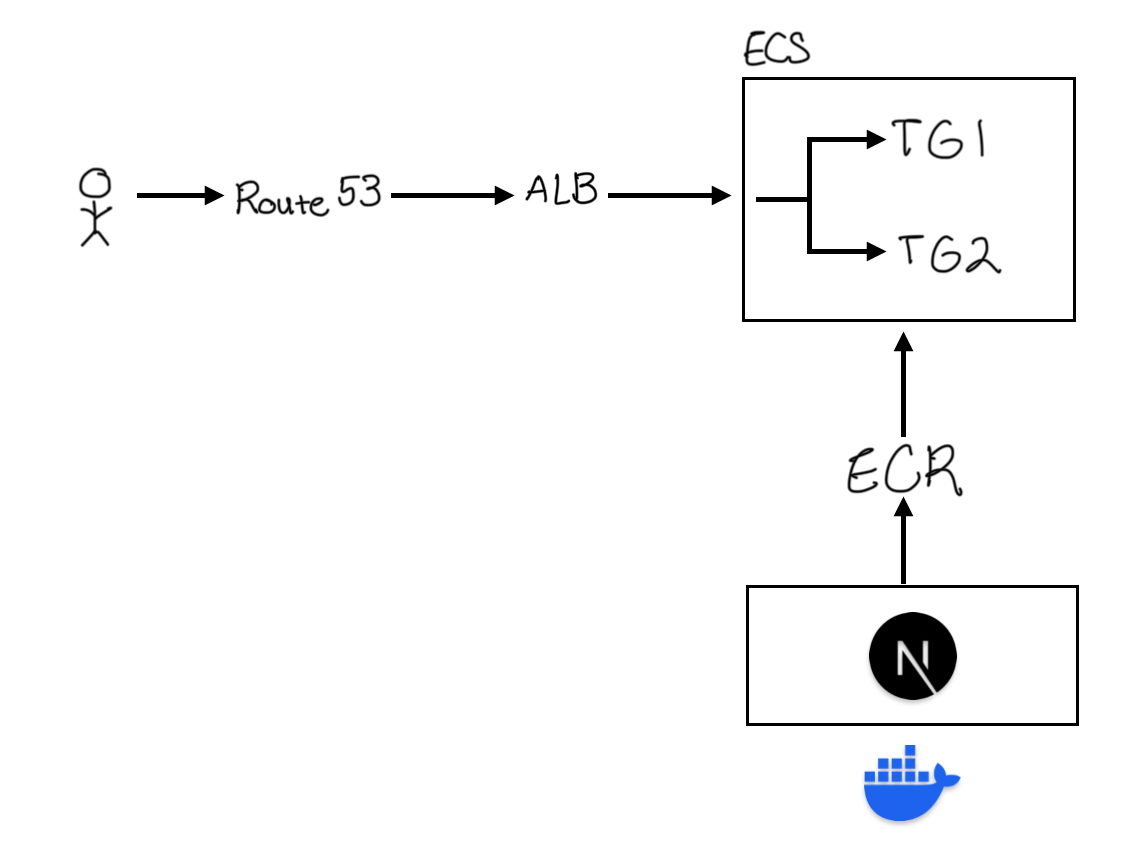
- Build Next.js project with Docker
- Upload built image to AWS ECR
- Provide zero-downtime service to users using ECS and CodeDeploy
The two places that take the most time are:
- Github Action: Building the Next.js project into a Docker image and uploading it to AWS ECR
- CodeDeploy: Creating ECS Tasks and Services based on the image uploaded to ECR and deploying to the target group
Since it was a project developed with Next.js and Yarn, I looked for actions that could reduce deployment time in this environment and conducted research on Yarn Berry and Zero Install.
1. Understanding Yarn Berry & PnP Concepts
Let me briefly go over what Yarn Berry is, why it emerged, and PnP (Plug'n'Play) that comes with it.
1-1. Yarn Berry?
Yarn Berry is a nickname referring to all versions after Yarn v2.
Yarn Berry emerged to improve the existing package management ecosystem (npm, yarn v1) - specifically, to improve the slow, inefficient, and unstable node_modules structure.

I think no lengthy explanation is needed.
The same packages get duplicated across projects, searching through parent directory node_modules to find packages...
The more a specific package can't be found, the more I/O calls like readdir and stat get repeated...
Even worse, depending on changes in the parent directory environment during package searching, sometimes dependencies can be loaded and sometimes they can't - quite a frustrating situation that occurs frequently. To solve this situation, Yarn Berry utilizes a strategy called PnP.
1-2. PnP(Plug'n'Play)
Plug'n'Play | Yarn According to the official documentation:
Yarn PnP is the default installation strategy in modern release of Yarn, an improved strategy that can replace the
node_modulesinstallation method and symlink-based approaches.
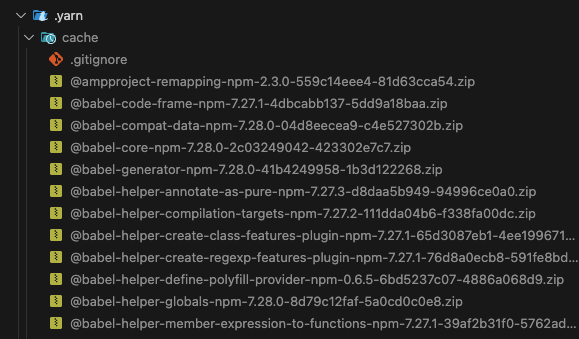
PnP doesn't create a node_modules folder but stores dependency information in a .yarn/cache folder.
At the same time, it records "dependency → storage location" mapping information in a .pnp.cjs file, so when calling specific dependencies, it can reference this mapping to find the actual package files. Since each package is stored in compressed file format and can't be decompressed every time, it uses a system called ZipFS.
❓ ZipFS (Zip File System)
- A file system that directly reads zip files as virtual paths
- Managing dependencies as zip archives provides the following advantages:
- Installation completes quickly because there's no need to create
node_modulesdirectory structures anymore- Each package has one zip archive per version, so no duplicate installations
- Since dependencies don't consist of many files, detecting changes or deleting all dependencies is fast
2. Applying Yarn Berry
Now that we understand what Yarn Berry and PnP are, it's time to actually apply them.
2-1. Initialization
To initialize yarn berry, execute the following command:
yarn set version berryAfter execution, a .pnp.cjs file that records dependency information is created.
Then proceed with .yarnrc.yml configuration to use PnP in the project.
nodeLinker: pnp
pnpEnableEsmLoader: true
enableGlobalCache: false
checksumBehavior: update
enableStrictSsl: true
yarnPath: .yarn/releases/yarn-4.9.2.cjs
2-2. Installing dependencies
# 1. Remove yarn cache
yarn cache clean

# 2. Remove all installation traces
rm -rf node_modules .yarn/cache

# 3. Reinstall
yarn install
When installing dependencies in a PnP environment, you can see that dependency information is stored in the .yarn/cache directory instead of node_modules.
2-3. gitignore (with or without zero install)
Proceed with .gitignore settings suitable for the PnP environment. This part is well explained in the official documentation, so you can follow it as is. Zero-install literally means not installing - here, it means not installing dependencies. I'll explain this in more detail later.
# zero-install O
.yarn/*
!.yarn/cache
!.yarn/patches
!.yarn/plugins
!.yarn/releases
!.yarn/sdks
!.yarn/versions

# zero-install X
.pnp.*
.yarn/*
!.yarn/patches
!.yarn/plugins
!.yarn/releases
!.yarn/sdks
!.yarn/versions
2-4. IDE Plugin Installation
In PnP mode, packages are managed in zip format, so you need to configure settings to directly read files stored in zip. For this, install the ZipFS plugin and enter the command to generate SDK files so packages can be recognized.

yarn dlx @yarnpkg/sdks vscode3. Zero Install strategy, and why we didn't adopt it
The zero install strategy mentioned briefly above refers to using version control like git instead of installing dependencies every time. In a well-configured zero install environment, any developer can run the project with just a git pull without any separate installation process.
I wanted to apply these benefits, so I reviewed zero install configuration - uploading all dependency compressed files to git - but decided not to adopt it for the following reasons:
3-1. still large dependency files

Although the overall dependency size was reduced, there were still cases where specific dependency compressed files exceeded 100MB.
To manage files over 100MB through git, you need to separately configure Git LFS (and all developers need to do this), and when such dependency files increase, pull and push processes also take a lot of time.
3-2. yarn install doesn't take long
This is the ultimate reason for not adopting zero-install. Even when running yarn install locally, it takes no more than 10 seconds at most, so I concluded that zero-install wasn't necessary.
Of course, zero-install is a really good feature. It allows anyone to run the project in the same environment. However, it's ultimately an optional feature. It's not necessarily the right approach, and not applying it doesn't have major disadvantages, so no need to worry too much.
(Related heated discussions #1, #2)
4. Next.js and Docker Optimization
4-1. Next.js standalone
As mentioned above, the places currently taking a lot of deployment time are Github Action and CodeDeploy. Here, CodeDeploy is the process of actually deploying services with the built docker image, and the time required increases proportionally to the size of this image.
To solve this, I applied the standalone option provided by Next.js.
The standalone option, as its name suggests (independent, standalone), allows applications to run independently without installing additional dependencies. It includes only minimal dependencies and files needed to run the server in the .next/standalone folder.
4-2. why we used node_modules instead of PnP in Docker
I wanted to complete the Next.js standalone + PnP combination, but eventually adopted node_modules in the Docker environment.
.yarnrc.docker.yml : used instead of .yarnrc.yml in Dockerfile
nodeLinker: node-modules
enableGlobalCache: false
checksumBehavior: update
enableStrictSsl: false
yarnPath: .yarn/releases/yarn-4.9.2.cjs
The standalone option tracks actual file paths and copies only what's needed, while PnP tracks virtual paths on ZipFS, causing dependency tracking to fail at runtime. In other words, the standalone option cannot work together with PnP. (Github Discussions: outputStandalone not working with Yarn PnP)
The Turbopack documentation, Next.js's next-generation build system, also states that Yarn PnP has no support plans, so it seems difficult to utilize both options at once.
4-3. Multi-stage Dockerfile
I modified the Dockerfile, which was previously configured with only a single stage, to a multi-stage structure.
This allowed me to include only the resources needed for actual runtime in the final image, building much lighter Docker images.
Conclusion
By introducing Yarn PnP and Next.js's standalone option, we achieved the following results:
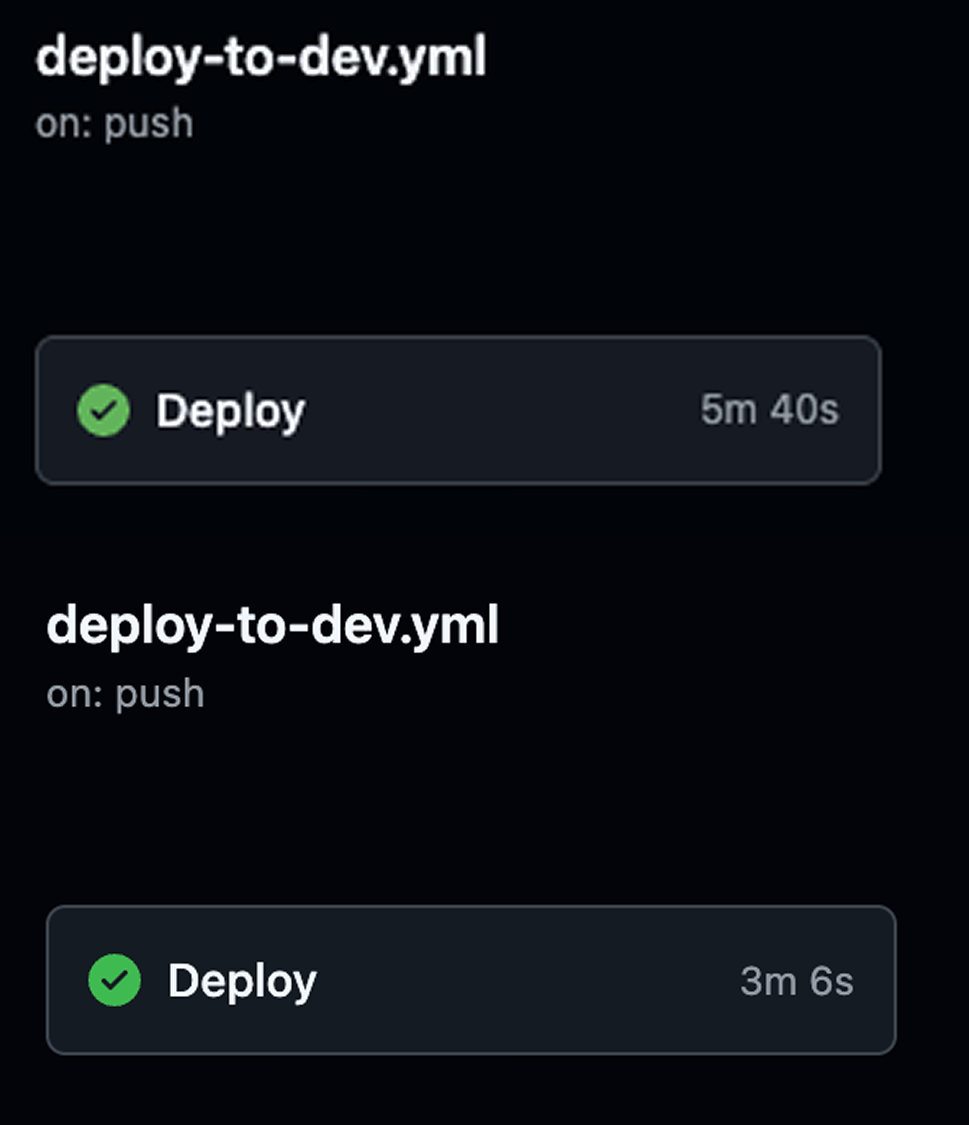
- 50% reduction in GitHub Action time (about 6 min → 3 min)
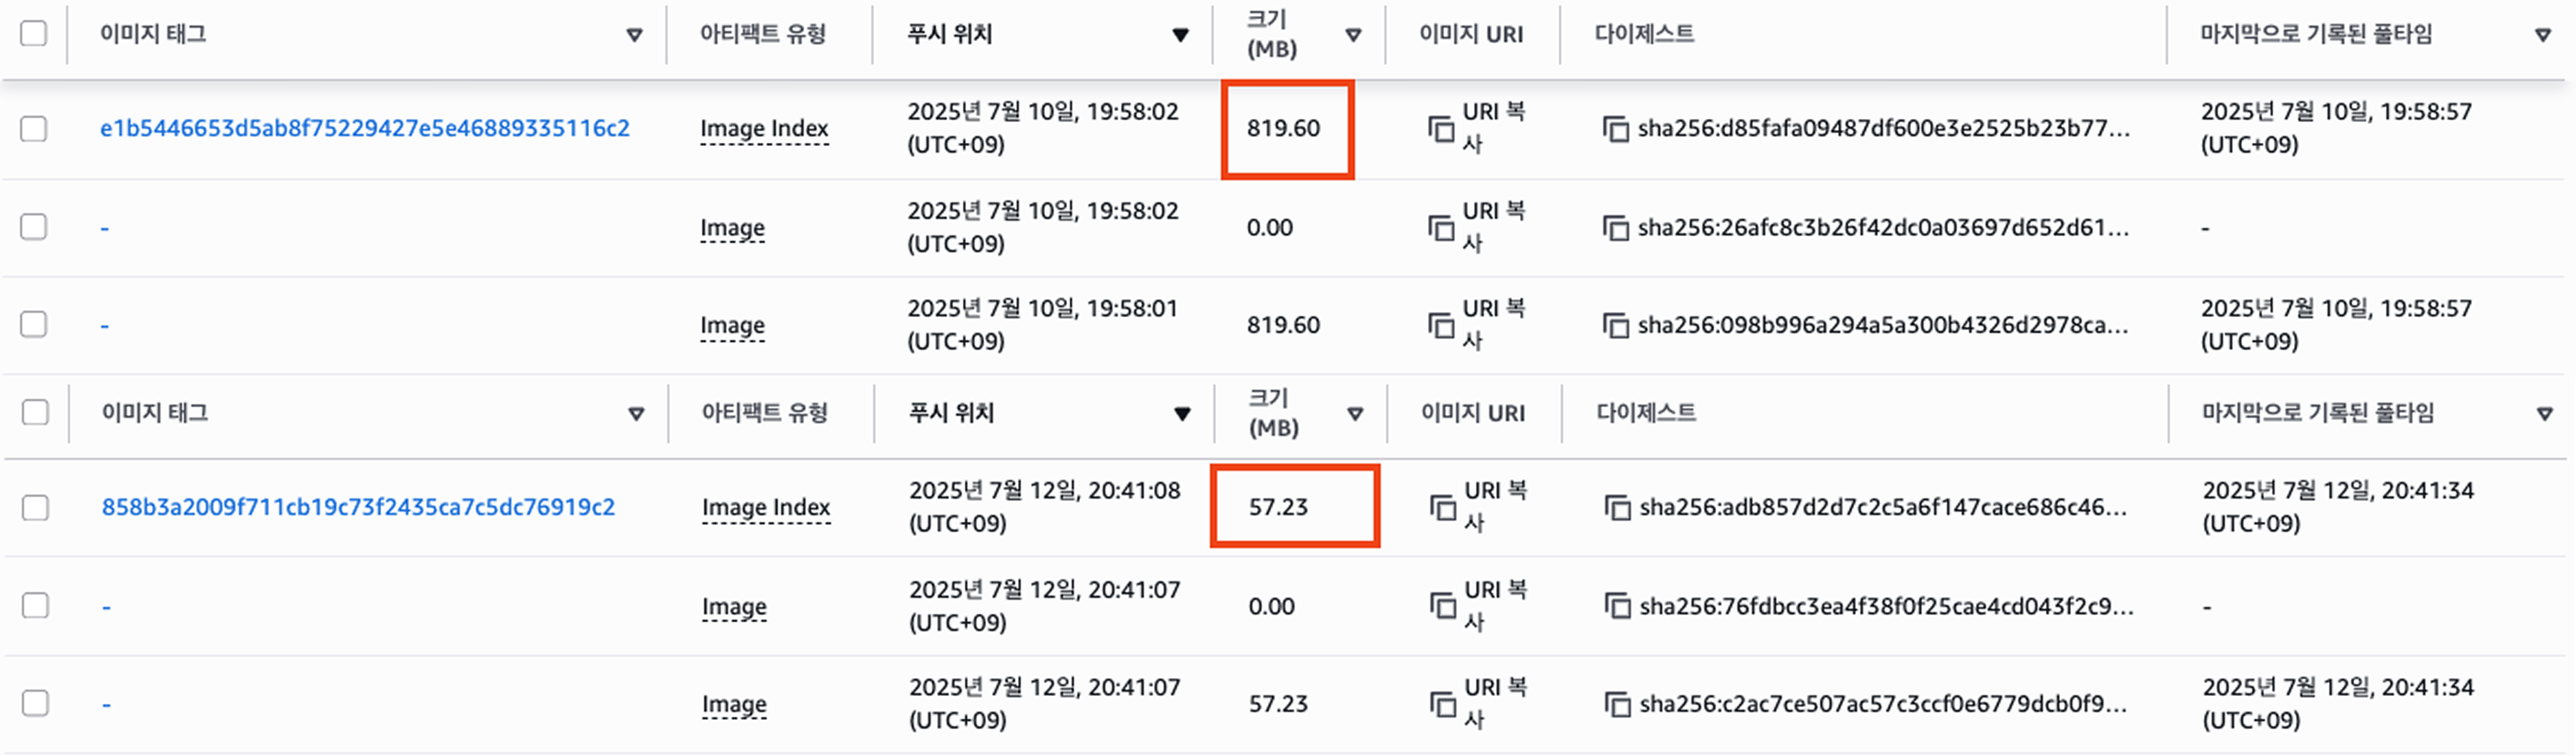
- 90% reduction in ECS image size (800MB ~ 1GB → 50MB)
- 30% reduction in AWS CodeDeploy time (about 3 min → 2 min)
- 50% reduction in total deployment time (total 10 min → total 5 min)
This was an opportunity to go beyond simply developing features and think more deeply about and improve the infrastructure we're currently using. At the same time, by sharing this with the team, we were able to grow together one step further.
In terms of results, being able to contribute to the entire team's productivity improvement through dramatic reduction in deployment time was a very rewarding opportunity.