BLOG
KO
[NextJS] Creating a Markdown Blog with NextJS
- Intro
- Pre-rendering
- Static Generation vs Server-side Rendering
- getStaticProps
- Rendering Markdown
- Dynamic Routes
- remark, rehype
- (Bonus) Markdown File Fast Refresh
- Conclusion
TL;DR
- Let's learn about Next.js Static Generation
- Let's learn how to render markdown files to pages
I finally completed my own website that I've been putting off! I bought the domain quite a while ago, but kept procrastinating. Now it's finally at a level where I can show it to others - I shared it on LinkedIn and can proudly show it to my acquaintances.
So, in this post, I want to record what I learned while building this blog.
Intro
The biggest motivation for planning my own website was to complete my own development blog where I could freely record and style content. Since I was using next.js, I initially considered creating a page.tsx for each page, but the volume would become too huge and I thought "Do I really need to do it this way...?".
While I was just thinking about it, I was studying the React official documentation and looking at the code to contribute to it, when I discovered that all the content in the official documentation is generated based on markdown files.
So, I decided to create a markdown blog in a similar way and set the following goals:
- Render markdown files to pages
- A structure where creating markdown files automatically reflects them in the blog without complex additional work
- Apply styling similar to react.dev or velog
Pre-rendering
Reference link: NextJS Official Documentation - Pre-rendering
Before learning how to render markdown files, let's first understand Pre-rendering.
By default, NextJS supports Pre-rendering. Pre-rendering is a method of rendering pages in advance at build time, which can bring better results in terms of performance and SEO.
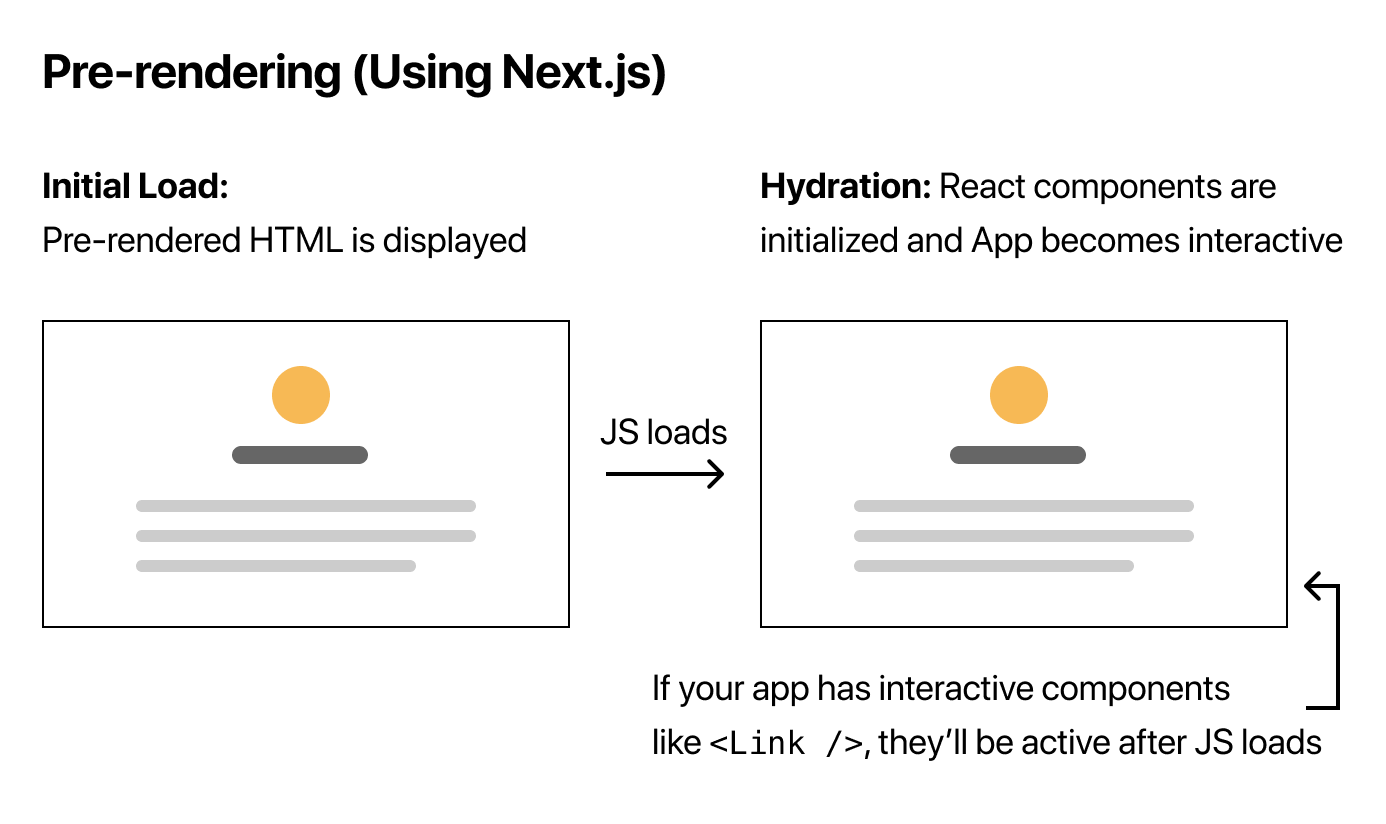
As shown in the figure above, it's a method where the server delivers a page with completed HTML to be rendered in the browser.
Static Generation vs Server-side Rendering
Next.js supports two types of Pre-rendering: Static Generation and Server-side Rendering.
Static Generation: A method that generates HTML at build timeServer-side Rendering: A method that generates HTML at request time
Both methods generate HTML on the server, but they differ in when that generation occurs.
So which method should be used when building a blog?
The content recorded in a blog doesn't change frequently, and there's no need to call pages every time based on user requests. Therefore, I decided to adopt the Static Generation method for blog implementation.
getStaticProps
We use getStaticProps to generate static pages.
getStaticProps is a special function supported by NextJS, where the props returned through getStaticProps are rendered on the page.
// pages/posts/index.tsx
// (2) Passed as props to the page.
export default function Post(props) { ... }

export async function getStaticProps() {
  const post = ...

  return {
    props: {
      post // (1) The data returned here becomes
    }
  }
}
Now that we know which rendering method to apply, it's time to render markdown files!
Rendering Markdown
Dynamic Routes
Reference link: NextJS Official Documentation - Dynamic Routes
What I wanted for my blog was for multiple markdown files to each become page routes while simultaneously having the markdown content rendered on the page.
For this, I created a posts/[id].tsx file and implemented it to fetch markdown file data using getStaticProps.
// pages/posts/[id].tsx
export default function Post(props) { ... }

// Define the paths for pages to be statically generated.
export async function getStaticPaths() {
  const paths = getAllPostIds()
  return {
    paths,
    fallback: false
  }
}

// Get post data corresponding to the id through params.id.
export async function getStaticProps({ params }: { params: { id: string } }) {
  const post = await getPostData(params.id)

  return {
    props: {
      post
    }
  }
}
remark, rehype
Now that we know how to create page routes, it's time to actually render markdown files. The official documentation explains this in detail, so I'll just summarize it briefly.
remark is a markdown parser based on unified. When you parse markdown files using remark, you can use the AST (Abstract Syntax Tree) returned by remark to convert them to HTML.
While you can convert markdown files to HTML using just remark and remark-html as described in the official documentation, the following aspects were lacking for the blog behavior I wanted:
- Hyperlinks always opening in the current tab
- Code highlighting not being applied, making readability poor
To solve this, I looked at the code from react.dev, which I used as a reference.
// plugins/markdownToHtml.js
const remark = require('remark');
const externalLinks = require('remark-external-links'); // Add _target and rel to external links
const customHeaders = require('./remark-header-custom-ids'); // Custom header id's for i18n
const images = require('remark-images'); // Improved image syntax
const unrwapImages = require('remark-unwrap-images'); // Removes <p> wrapper around images
const smartyPants = require('./remark-smartypants'); // Cleans up typography
const html = require('remark-html');

module.exports = {
  remarkPlugins: [
    externalLinks,
    customHeaders,
    images,
    unrwapImages,
    smartyPants,
  ],
  markdownToHtml,
};

async function markdownToHtml(markdown) {
  const result = await remark()
    .use(externalLinks)
    .use(customHeaders)
    .use(images)
    .use(unrwapImages)
    .use(smartyPants)
    .use(html)
    .process(markdown);
  return result.toString();
}
React was using various remark-related plugins to convert and render markdown files to the desired format, and I decided to reference this.
When I tried to use plugins like remark-external-links, I found that many were in Legacy status and commonly recommended using rehype-~ plugins instead.
rehype is an HTML parser based on unified, just like remark. You can generate HTML using the AST returned from remark, and like remark, you can use various plugins to convert HTML to the desired format.
The code I wrote to convert my markdown files to HTML using remark and rehype is as follows:
// lib/directoryToHtml.ts
import fs from 'fs'
import path from 'path'
import matter from 'gray-matter'

import { unified } from 'unified'
import remarkParse from 'remark-parse'
import remarkUnwrapImages from 'remark-unwrap-images'
import remarkRehype from 'remark-rehype'
import rehypeExternalLinks from 'rehype-external-links'
import rehypeStringify from 'rehype-stringify'
import rehypePrettyCode from 'rehype-pretty-code'

const directoryToHtml = async (directory: string, id: string) => {
  const fullPath = path.join(directory, `${id}.md`) // Read the markdown file at this path.
  const fileContents = fs.readFileSync(fullPath, 'utf8') // Read the file contents.
  const matterResult = matter(fileContents) // Extract metadata.

  const processedContent = await unified()
    .use(remarkParse)
    .use(remarkUnwrapImages)
    .use(remarkRehype)
    .use(rehypePrettyCode as any, { // Code highlighting
      theme: 'one-dark-pro'
    })
    .use(rehypeExternalLinks, { target: '_blank', rel: ['noopener'] }) // Make hyperlinks open in new tabs
    .use(rehypeStringify)
    .process(matterResult.content)

  const contentHtml = processedContent.toString()

  return {
    id,
    contentHtml,
    ...matterResult.data
  }
}

export default directoryToHtml
I especially recommend the rehype-pretty-code plugin that helps with code block highlighting.
When you just render markdown files, it's hard to read and lacks any styling, making readability poor. This plugin is very useful as it parses code according to the code block language and applies appropriate styling..!
(Bonus) Markdown File Fast Refresh
When editing markdown files to write blog posts, NextJS's default Fast Refresh isn't supported, so you have to keep refreshing the page to check. According to the official documentation, files outside the React tree structure don't support Fast Refresh.
However, since there was a limit to continuing to write posts and refresh like this, I looked for a solution and thankfully found next-remote-watch created by some capable person.
This package supports Fast Refresh by detecting changes in files that aren't in the next.js project. By applying this command as follows, I was able to create my own blog where markdown file changes are immediately reflected.
// package.json
{
  "scripts": {
    "dev": "next dev",
    "write:posts": "next-remote-watch src/content/posts" // Detect file changes in the posts folder
  }
}
Conclusion
It seemed overwhelming at first not knowing how to build it, but by referring to the official documentation and React's official documentation and code, I was able to create my own markdown blog without too much difficulty!
Actually, what I ultimately wanted was to add components within markdown files to apply various styling like rendering actual pages, but looking at React's code, the implementation difficulty seemed quite high, so I decided to properly tackle it later..!
What I learned through this post
- How to create static pages using
getStaticProps- The difference between
Static GenerationandServer-side Renderingand when to use them- How to render markdown files using
remarkandrehype